FAQ Q300: I need a calendar preview showing not only availability information but also some details of the reservations
Sekcja: Availability calendar
The calendar previews generated by planyo will only include availability information (or in case of events, the names of events starting on given dates). However, there's now a solution for this problem: you will need to use our free service called planyo.net. This service allows you to insert a calendar preview widget on your website with events coming from planyo or any other ical-based source.This solution lets you create a calendar preview which shows precise information that you want to disclose about each reservation, including: reservation color, customer name, company name, nickname or any other custom field in the reservation form. This solution is especially useful for clubs with a limited number of members (tennis courts / squash etc) and conference rooms where a tablet outside each room can display the day's schedule with some info about the meetings taking place.
Now we have a new template (by default with the ID 1) so we'll need to select it in the Template dropdown in the ical feed creator section. As we'll need one ical feed for each resource, in the Resource option choose your first resource. You can leave the other settings at the default, except we'll change the value of Vacations included in the feed in order to also export the vacations.
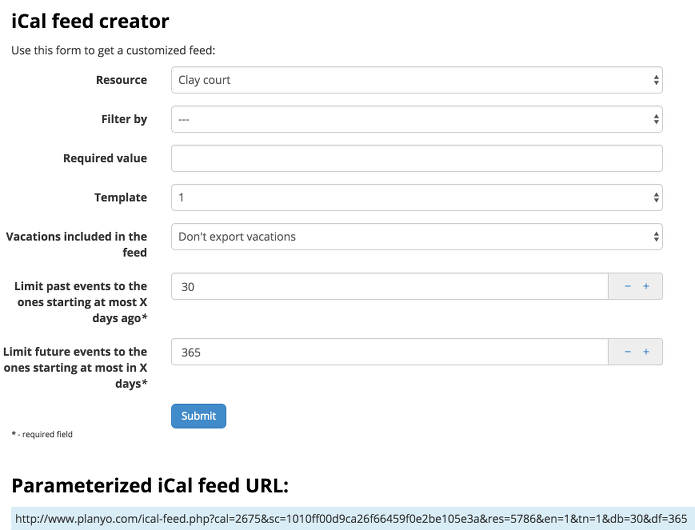
After clicking submit you'll see the iCal feed URL in the section Parameterized iCal feed URL. Copy this URL to the clipboard.
Now open planyo.net in another browser tab and in the Get started section enter your email address and the captcha to continue. On the next page, paste the ical feed URL into the field iCal feed URL. Click the more options >> button and enter the name of the resource associated with this feed. Click the blue plus (+) button in order to add another feed to this calendar. Again, fill out the resource name and the feed URL repeating the previous step on the Data export (iCal) page on planyo.com (in the other browser tab) for your second resource. You'll need to do this for each of the resources you'll be exporting. In this sample we'll export just two resources.
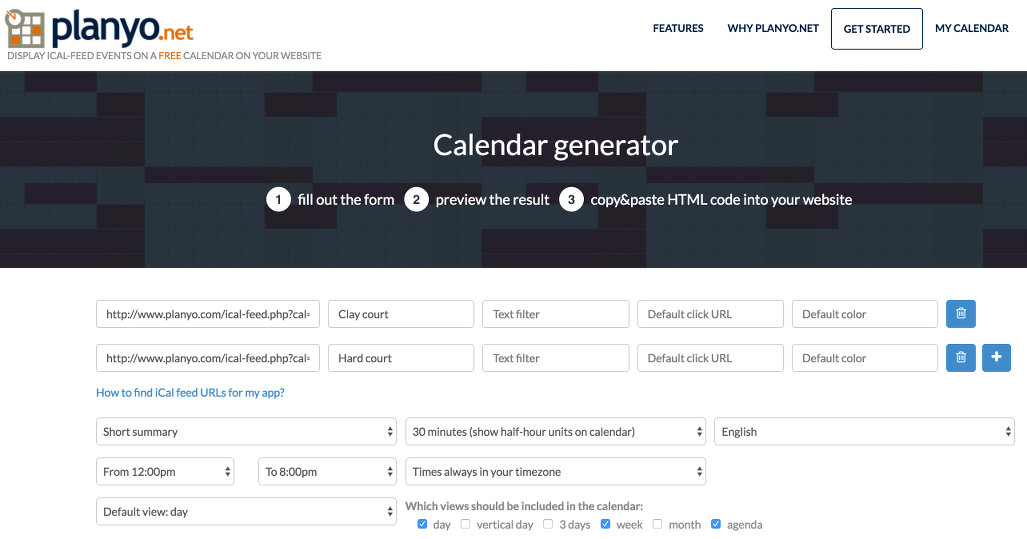
Carefully set the other options. You should leave the value Short summary unchanged as we'll only use the summary field of the ical feed. A very important option is the minimum time unit of the events which should be set as configured in planyo, leave it at the default of 1 day only for day-based calendars. Another important option is Which views should be included in the calendar - experiment with the preview to see the different views. Some will make more or less sense depending on your configuration and number of resources (calendars for a single resource have more views available). Some views may not be available according to your configuration even though you can select the checkbox.
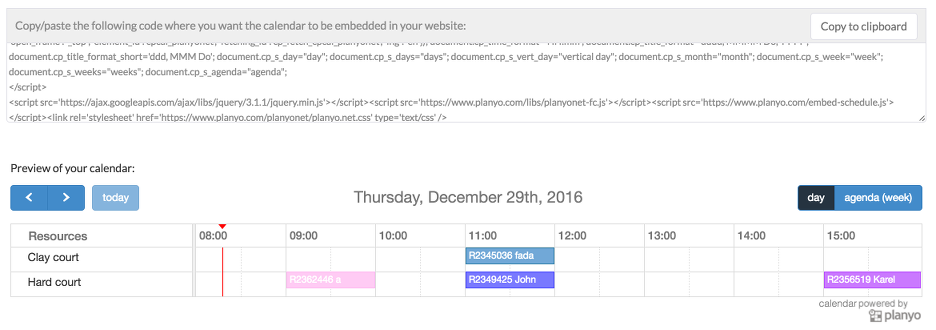
When you're satisfied with the calendar preview, copy the calendar's HTML code to clipboard and paste it into your website. Make sure your CMS / web editor allows you to insert HTML code which includes Javascript. If not possible by default, check the documentation as this should be always possible.
You can come back to planyo.net any time in the future in order to update your calendar configuration. There is no login you need to enter, the login information is stored in a cookie. Please note that you'll also need to click on a verification link in an email sent to you by planyo.net. If you fail to do this within 24 hours, the calendar view will not work anymore.
Step-by-step instructions
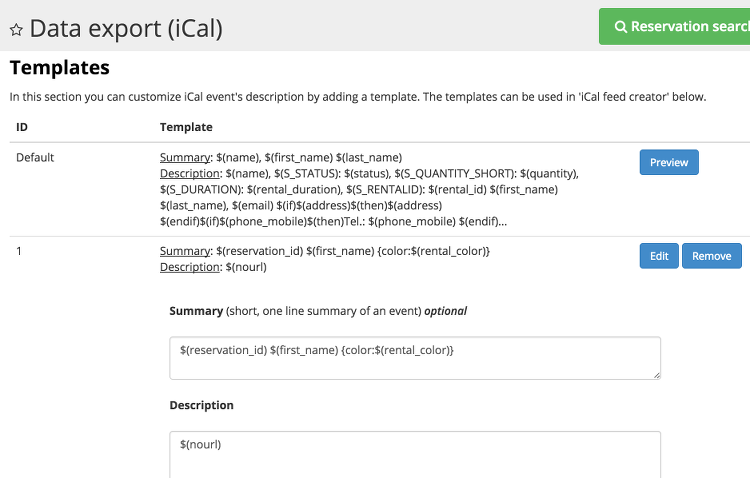
First go to Site Settings / Data export (iCal) in order to configure the ical feed which will be used. Now in the Templates section you need to create a new template which will determine which information will be exported - click Add new template. In this example, we'll only export the reservation ID and customer's first name but you can export any custom field you've added to your forms, e.g. company name or member ID. We'll also want to export the reservation color using the special planyo.net tag {color:$(rental_color)}. You can leave the description field empty, except here we'll add the $(nourl) tag which removes the link to the reservation details from the export. If you don't include this tag, clicking on the reservation in the resulting schedule view would take the user to the reservation details page which should be private and not accessible by other users. Note that an alternative url can be passed to planyo.net in form of the {url:..} tag, see the details at the end of this document.Now we have a new template (by default with the ID 1) so we'll need to select it in the Template dropdown in the ical feed creator section. As we'll need one ical feed for each resource, in the Resource option choose your first resource. You can leave the other settings at the default, except we'll change the value of Vacations included in the feed in order to also export the vacations.
After clicking submit you'll see the iCal feed URL in the section Parameterized iCal feed URL. Copy this URL to the clipboard.
Now open planyo.net in another browser tab and in the Get started section enter your email address and the captcha to continue. On the next page, paste the ical feed URL into the field iCal feed URL. Click the more options >> button and enter the name of the resource associated with this feed. Click the blue plus (+) button in order to add another feed to this calendar. Again, fill out the resource name and the feed URL repeating the previous step on the Data export (iCal) page on planyo.com (in the other browser tab) for your second resource. You'll need to do this for each of the resources you'll be exporting. In this sample we'll export just two resources.
Carefully set the other options. You should leave the value Short summary unchanged as we'll only use the summary field of the ical feed. A very important option is the minimum time unit of the events which should be set as configured in planyo, leave it at the default of 1 day only for day-based calendars. Another important option is Which views should be included in the calendar - experiment with the preview to see the different views. Some will make more or less sense depending on your configuration and number of resources (calendars for a single resource have more views available). Some views may not be available according to your configuration even though you can select the checkbox.
When you're satisfied with the calendar preview, copy the calendar's HTML code to clipboard and paste it into your website. Make sure your CMS / web editor allows you to insert HTML code which includes Javascript. If not possible by default, check the documentation as this should be always possible.
You can come back to planyo.net any time in the future in order to update your calendar configuration. There is no login you need to enter, the login information is stored in a cookie. Please note that you'll also need to click on a verification link in an email sent to you by planyo.net. If you fail to do this within 24 hours, the calendar view will not work anymore.