Tutorial: Finding your way around the administration panel (1 / 6)
Tutorial Table of Contents
part 1: Reservations tabpart 2: Reservation details
part 3: User details
part 4: Schedule tab
part 5: Search and settings tabs
part 6: Subscription and reports tabs
Part 1 of 6: Reservations tab

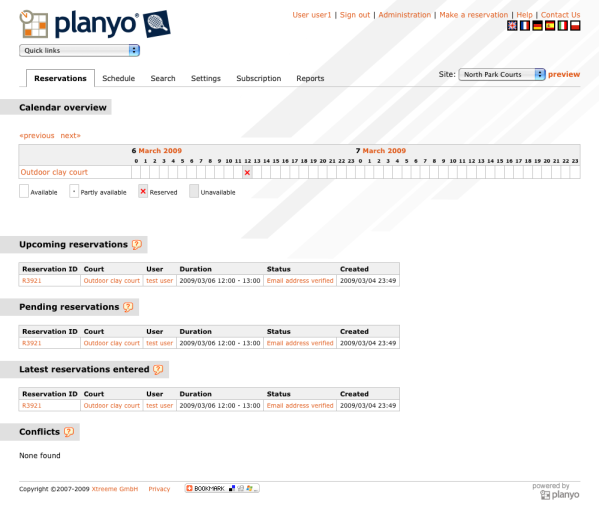
Fig 1. The administration panel - reservations tab Let's start from the top of the admin panel -- you'll notice the 'administration' link on top of the page - you can click this link from any planyo page to access your admin panel. Next to it are links for signing out, for editing your account settings (user xxx) and a link that lets you add new reservations. This is where you go if e.g. a customer calls you and wishes to make a reservation by phone (or in person). A bit lower you'll see quick links - this is simply a quick way to access different planyo functions - administrative and others. To the bottom you'll find tabs that represent functionalities explained below. To the right of the tabs, you can see the list of your planyo sites (in case you create more than one) with a preview button that takes you directly to the user view of your site. You can also add a new site here. The six tabs are:
Reservations tab
The reservations tab is something like your email inbox -- all activity that calls for your attention is listed here. On top you'll see the calendar preview -- this is the same calendar as the one seen by your clients -- you can use it to quickly check availability for any given time. Then you have three lists with bookings:- Upcoming reservations - these are the bookings made any time in the past for the rentals coming up in the near future. Here you can see the clients that will be arriving soon.
- Pending reservations - these are the bookings that have been entered into the system but have not yet been confirmed. It's best to either confirm or reject bookings as soon as possible so the clients can quickly get the feedback. Some of the bookings will say 'email address verified' and other simply 'reserved'. There are three reasons why a booking may not have been verified: not enough time has passed (the client may not have checked their email account after making the reservation), the client misspelled the email address, or their spam filtered blocked the email verification message. The action to be taken depends on your reservation model - you may want to call the customer or send them a private email asking to confirm the validity of the email address. Please note that your model may not require manual confirmations so you may never see any reservations here (e.g. if your clients are required to have a password). If you want to confirm or reject a reservation, click on the reservation number to go to the detailed view of the bookings. You'll find the details below.
- Latest reservations entered - here are the reservations recently entered into the system.
- Conflicts - Conflicts happen when a reservation is entered for a resource that's not available. This is possible only when you enter vacation for a resource already occupied at given time. Conflicts do not occur in other situations. A conflict should be resolved as soon as possible. It's possible by going to the detailed view by clicking on the reservation id. More in this FAQ